
How to Use Context Mapping for Data Architecture
Most data architecture issues start before any pipeline is built. In many teams, the root problem is unclear ownership, mixed definitions, and weak boundaries between domains.
Here’s the short version: I use context mapping to define bounded contexts, label how they relate, pick the right integration style, and keep those choices up to date as systems change. That helps me cut rework, lower pipeline breakage, and avoid data models that drift over time.
If I had to boil the article down to four steps, it would be this:
- Define bounded contexts by business function, language, ownership, and source of record
- Classify relationships between contexts, such as customer-supplier, conformist, ACL, open host service, or separate ways
- Draw the map with data direction, translation points, and latency needs
- Use the map to choose integrations like streaming, batch pulls, APIs, or shared tables
- Review the map often when schemas, contracts, or ownership change
A few points stand out:
- When teams skip boundary work, integration costs often go up fast
- A context map is not a data-flow chart or org chart; it shows ownership, model boundaries, and where translation is needed
- Push flows fit low-latency needs, while pull flows fit reporting and correctness-first work
- For messy upstream systems, an ACL can protect downstream models from schema churn
- Shared data products work better when teams publish clean domain data instead of exposing raw source schemas
About 80% of data integration work is often spent dealing with mismatched models, bad handoffs, and schema changes rather than raw movement of data. That’s why mapping the relationships first usually saves time later.
If you want a simple way to connect business domains to pipelines, warehouses, and AI-ready data products, this process is the core idea.
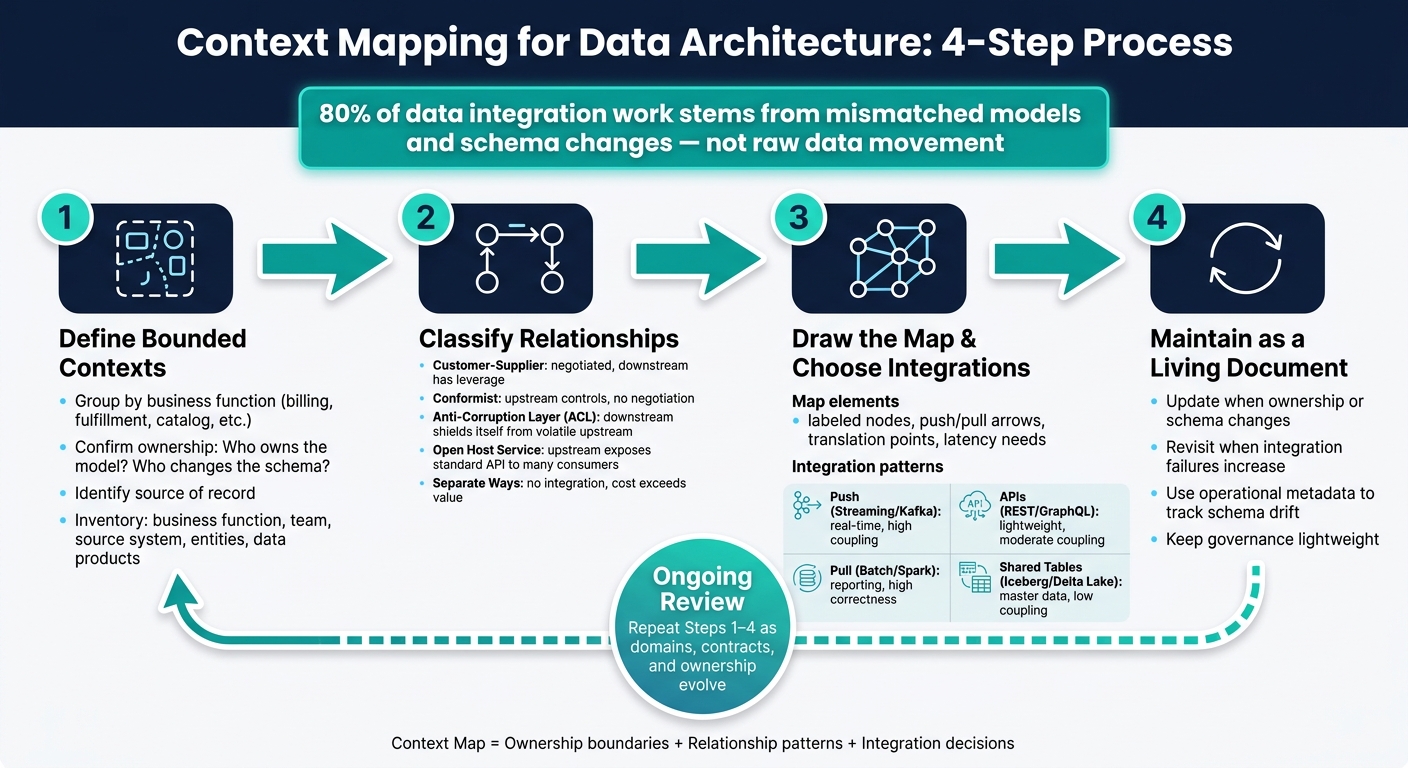
Context Mapping for Data Architecture: 4-Step Process
Introduction to Context Mapping - Michael Plöd - DDD Europe 2022

sbb-itb-61a6e59
Step 1: Define the Bounded Contexts
Start by defining the contexts you plan to map. In plain English, that means spotting each bounded context: a distinct part of the business where data has a specific meaning, a clear owner, and a set purpose. These contexts are the building blocks for the map you’ll create next.
Find Boundaries from Business Capabilities and Language
Begin by grouping systems and datasets around what the business actually does. Think billing, customer accounts, fulfillment, product catalog, and vendor management. Each area has its own data needs, rules, and ownership.
A boundary usually shows up when the same term means different things in different parts of the business, or when the rules and owners change. That’s the tell. Bounded contexts should come from business needs, not from the tools or databases already in place.
Confirm Ownership, Source Systems, and Data Responsibilities
Once you’ve outlined a few candidate contexts based on business function and language, pressure-test each one with three questions: Who owns the model? Who can change the schema? Which system is the source of record?
Focus on current ownership, not the org chart. In other words, document who actually controls the data and the schema day to day.
For source systems, be specific. Name the current system of record directly. That one detail will shape integration choices later.
List the Contexts Before Drawing the Map
Before you move into relationships, create a simple inventory. For each context, note:
- The business function it serves
- The team that owns it
- The source system
- The main entities it manages
- Any key data products it produces or consumes
| What to Capture | Key Elements to Capture |
|---|---|
| Business Function | Billing, fulfillment, customer accounts, or product catalog |
| Ownership | Team responsible for the domain model and schema changes |
| Source Systems | Sharded databases, website interactions, or vendor systems |
| Data Responsibilities | Data quality, privacy, retention, and security requirements |
| Domain Terms | Specific language used by business stakeholders, such as "shipping delay" or "vendor quality" |
A rough but accurate inventory is enough. You’re not trying to make it perfect at this stage. You just need a clear starting point for classifying relationships in Step 2.
Step 2: Classify Relationships Between Contexts
Once you’ve listed your contexts, the next job is to define how each one relates to the others.
For every context pair in your inventory, use the ownership, source, and responsibility notes from Step 1 to classify the relationship. This is where things start to get concrete. These relationship choices shape control, translation work, and risk.
Use the Core Relationship Patterns
Use five patterns to describe cross-context data relationships. Each one comes with its own trade-offs around schema control, translation cost, and pipeline fragility.
Customer-Supplier is a negotiated relationship. The upstream context agrees to meet the downstream context’s needs. Use it when downstream datasets or products have enough leverage to negotiate schema and contract changes with the upstream owner.
Conformist means the downstream context adopts the upstream model as-is. There’s no negotiation. This often shows up when you’re integrating with external SaaS or systems you can’t influence.
Anti-Corruption Layer (ACL) is the move you make to shield downstream models from messy upstream data. The downstream context builds a translation layer that converts the upstream model into its own clean internal model. Use an ACL when the upstream schema is volatile, legacy, or controlled by a third party. For critical master data, pair it with write-audit-publish.
Open Host Service means the upstream context exposes a standard interface, usually a REST API or GraphQL endpoint, that many downstream consumers can use. The upstream owns the model and makes it available through that API.
Separate Ways means there’s no integration at all between the two contexts. Use it when the cost of integration is higher than the business value.
Compare Model Control, Fit, and Risks
The table below shows what each pattern means in practice: who controls the model, when the pattern makes sense, and where things can go sideways.
| Relationship Pattern | Who Controls the Model | When to Use It | Data Architecture Impact | Main Risk |
|---|---|---|---|---|
| Customer-Supplier | Negotiated | Downstream has leverage to request changes from upstream | Requires data contracts and coordination on master data quality | High coordination overhead between teams |
| Conformist | Upstream | Integrating with external SaaS or systems you can't influence | Downstream directly adopts the upstream schema; minimal translation work | Downstream breaks immediately when upstream changes |
| Anti-Corruption Layer (ACL) | Downstream | Upstream schema is volatile, legacy, or third-party controlled | Requires a transformation layer to clean and validate raw data | Increased complexity and maintenance of the translation logic |
| Open Host Service | Upstream | One upstream context serves many downstream consumers | Supports lightweight integration through REST or GraphQL | Upstream may become a bottleneck for specific downstream needs |
| Separate Ways | Neither | Integration cost exceeds business value | No integration; contexts operate independently to avoid complexity | Data silos and lack of unified business insights |
These classifications tell you where to translate, where direct integration makes sense, and where it’s better to keep contexts apart. You’ll use these pattern choices in Step 3 to decide the right integration pattern for each context pair.
Step 3: Draw the Context Map and Turn It Into Integration Decisions
Now it’s time to get the contexts out of your head and onto the page. This is the point where a context map stops being a diagram and starts acting like an integration plan.
Draw the Map with Direction, Ownership, and Translation Points
Show each bounded context as a labeled node. Then draw arrows between nodes to show which way data moves. Keep the map tied to two things at once: the business problem and the technical setup.
Label each arrow as push or pull. Also note whether the flow needs to be near-real-time or can run on a schedule. That relationship tells you if the boundary should use push, pull, or a translation layer.
Next, mark the translation points. These are the spots where the downstream context checks, reshapes, or reinterprets incoming data. If you use write-audit-publish to protect master data or data products, add that to the arrow.
Don’t overthink the first draft. A whiteboard sketch is enough. The point isn’t to make it pretty. The point is to get engineers, analysts, and domain owners looking at the same picture. From there, those arrows help you pick the lightest integration pattern that still fits the domain’s latency and ownership needs.
Choose Integration Patterns from the Map
Pick the integration style from the map itself, not from habit or team preference. Each relationship should lead to one integration choice, along with its trade-offs.
| Integration Choice | Best Use Case | Coupling Level | Data Quality Risk | Maintenance Cost |
|---|---|---|---|---|
| Push (Streaming/Kafka) | Real-time needs, low latency | High | Higher | High |
| Pull (Batch/Spark) | Analytical reporting, high correctness needs | Low | Lower | Moderate |
| APIs (REST/GraphQL) | Lightweight integration or complex multi-source queries | Moderate | Low | Moderate |
| Shared Tables (Iceberg/Delta Lake) | Master data, cross-team analytics | Moderate | Low | Low |
This table makes the trade-offs easier to see at a glance:
- Push works when timing matters and data needs to move fast, but it ties teams together more tightly.
- Pull fits reporting jobs where correctness matters more than speed.
- APIs are useful when the integration is light or when one consumer needs to query several sources.
- Shared tables fit master data and analytics use cases where teams need access to the same published data.
Apply the Map to Pipelines, Warehouses, and AI-Ready Data Products
Once you’ve picked the pattern, use the map to place staging, validation, and publishing at the boundary it shows. Some relationships can move data straight through. Others need a translation layer before anything gets published downstream.
This same map also helps with analytics and AI work in data engineering. It preserves lineage and keeps domains separate, which saves a lot of pain later. High-quality master data can be built in a data lake with Iceberg or Delta Lake, then guarded with write-audit-publish before it reaches downstream consumers. That lets teams build shared data products without exposing source schemas or copying business logic all over the place.
Step 4: Review, Maintain, and Use the Map as a Living Document
Treat the context map like a living document, not a one-and-done diagram. It only helps if it matches the way your domains, contracts, and ownership work today. Once you’ve picked your integration patterns, come back to the map whenever those boundaries or contracts shift - especially the bounded contexts, relationship patterns, and integration choices from Steps 1 through 3.
Update the Map When Domains or Contracts Change
Update the map right away when ownership or schema changes happen, because those changes can make the map wrong. It also makes sense to revisit the map when integration failures start piling up and signal that the current design no longer fits. The goal isn’t heavy process. Keep governance light.
Operational metadata can make this much easier. It helps you track job status, data quality signals, and schema drift so changes show up sooner instead of later. Metadata catalogs can ingest and store schema, lineage, and ownership changes. Usage logs can also help you spot stale relationships that no longer need to be on the map.
Key Takeaways for Scalable Data Architecture
Use the review process to keep earlier mapping choices tied to current reality. The four steps build on each other in a clear sequence: define bounded contexts, classify relationships, draw the map, and then maintain it.
Build for what you need now. Then come back and check the map as domains and contracts change.
Teams tend to get the most from the map when it stays visible and gets reviewed whenever contracts, ownership, or system behavior changes. Regular reviews help keep ownership, contracts, and integrations in sync.
FAQs
How do I know if I’ve defined the right bounded contexts?
You’ve defined the right bounded contexts when they line up with your business goals and day-to-day needs. Start with the exact business problem you’re trying to solve. A good context should tie back to something you can measure, whether that’s lower costs, fewer handoff issues, or better customer outcomes.
It also helps to check whether those boundaries make the system easier to maintain and scale without adding extra mess. If a context looks clean on paper but creates more coordination work in practice, that’s usually a red flag. And because business needs change over time, your contexts should stay modular enough to change with them instead of boxing you in.
When should I use an anti-corruption layer instead of direct integration?
Use an anti-corruption layer (ACL) when you need to stop an external system’s data model, domain logic, or data issues from leaking into your internal architecture.
A direct integration can be fine in simple, trusted setups. But an ACL makes more sense when the source schema changes often, doesn’t match what your system needs, or falls short of your internal data quality standards.
How often should a context map be reviewed and updated?
Review and update a context map when business needs, strategy, or market conditions shift. Your data architecture needs to stay flexible enough to support changing requirements.
Treat context maps as living documents, not one-and-done diagrams. Regular updates help keep the system maintainable and in step with current goals.