
Snowflake for Data Retention: Best Practices
Managing data retention effectively is crucial for balancing compliance, cost, and security. Snowflake offers features like Time Travel, Fail-safe, and Storage Lifecycle Policies to automate and streamline the data lifecycle. Aspiring engineers can master these concepts in a data engineering boot camp. Here's what you need to know:
- Time Travel: Access previous versions of data for up to 90 days (Enterprise+ editions) or 1 day by default.
- Fail-safe: A non-configurable 7-day recovery buffer for emergencies.
- Retention Settings: Use
DATA_RETENTION_TIME_IN_DAYSto set custom retention periods at account, database, schema, or table levels. - Table Types: Choose between Permanent (high protection), Transient (no Fail-safe), or Temporary (session-only) tables based on your use case.
- Storage Tiers: COOL (instant access, higher cost) and COLD (cheaper, 48-hour retrieval delay) help optimize storage expenses.
To build a retention policy:
- Identify data types and set appropriate retention periods (e.g., 90 days for critical data).
- Automate transitions using Storage Lifecycle Policies.
- Monitor compliance with Snowflake's built-in tools like
TABLE_STORAGE_METRICS.
Data Retention Period in Snowflake

sbb-itb-61a6e59
Core Snowflake Features for Data Retention
Snowflake Data Retention: Table Types & Storage Tiers Compared
Snowflake uses a multi-layered approach to data retention, helping users balance protection, duration, and costs.
Time Travel and Fail-safe
Time Travel allows you to access previous versions of your data, even after updates or deletions. With SQL clauses like AT or BEFORE, you can query, clone, or restore objects based on a timestamp, offset, or Query ID. By default, Time Travel is set to 1 day (24 hours) for all Snowflake accounts and editions. However, if you're using Enterprise Edition or higher, you can extend this window to 90 days for permanent tables.
When the Time Travel window ends, Fail-safe becomes your safety net. This is a fixed, non-configurable 7-day period meant for recovery in extreme situations, such as operational failures. Unlike Time Travel, Fail-safe recovery requires Snowflake Support to initiate, and the process can take anywhere from a few hours to several days. Keep in mind that this feature is not intended for routine recovery tasks.
Both Time Travel and Fail-safe come with additional storage costs, so it's important to choose the right table type for your needs.
The DATA_RETENTION_TIME_IN_DAYS Parameter
The DATA_RETENTION_TIME_IN_DAYS parameter controls the Time Travel window. You can configure it at the account, database, schema, or table level, with child objects inheriting the setting from their parent unless overridden.
Here’s how you might use it:
-- Set retention at the database level
ALTER DATABASE my_database SET DATA_RETENTION_TIME_IN_DAYS = 30;

-- Override at the table level
ALTER TABLE my_database.my_schema.sensitive_table SET DATA_RETENTION_TIME_IN_DAYS = 90;

-- Disable Time Travel for a high-churn table
ALTER TABLE my_database.my_schema.staging_table SET DATA_RETENTION_TIME_IN_DAYS = 0;
To avoid accidentally disabling Time Travel across your account, use the MIN_DATA_RETENTION_TIME_IN_DAYS parameter. This enforces a minimum retention period that no table can go below. Remember, setting DATA_RETENTION_TIME_IN_DAYS to 0 on a permanent table skips Time Travel and moves data straight into the Fail-safe window.
Once retention parameters are set, selecting the right table type is the next step in managing costs and compliance effectively.
Permanent, Transient, and Temporary Tables
Choosing the appropriate table type is key to managing Snowflake storage efficiently. Each table type offers different levels of protection and use cases:
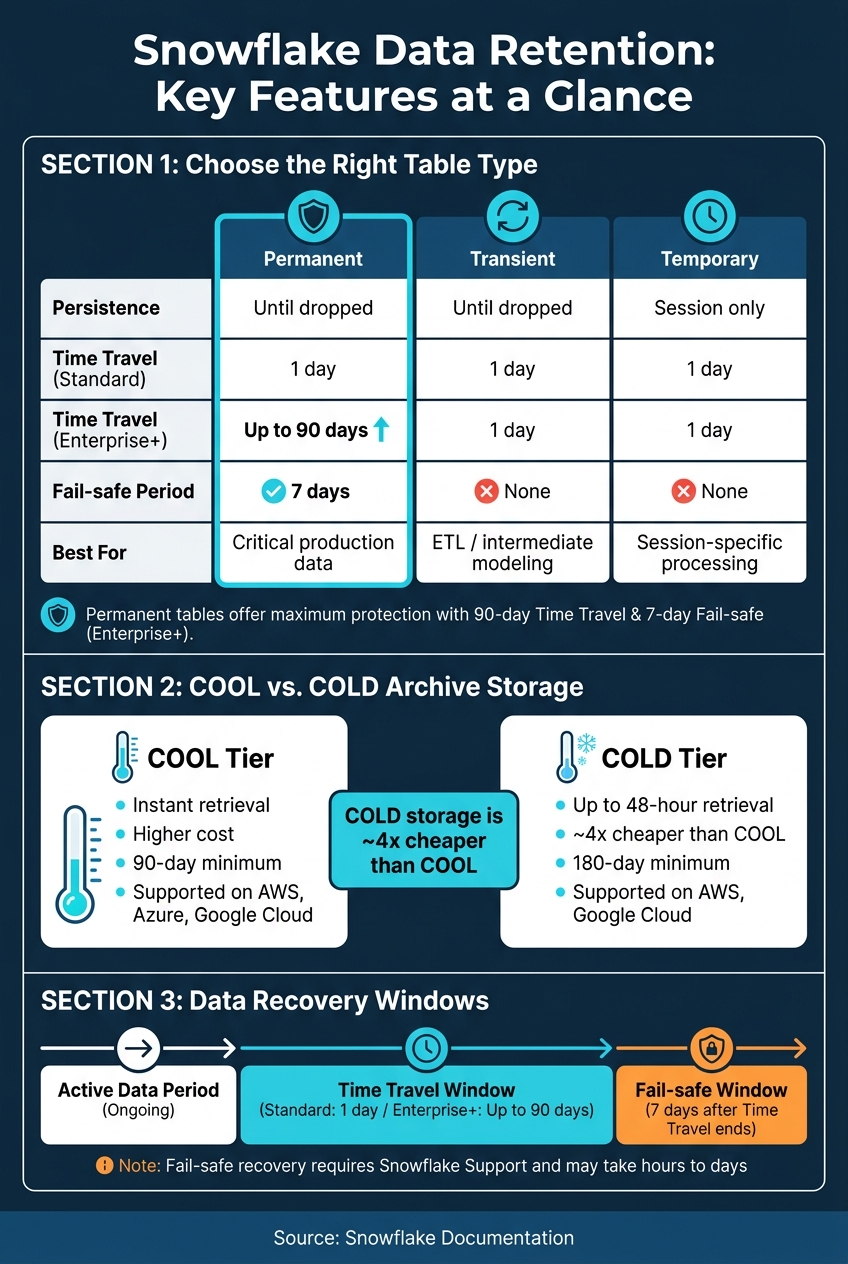
| Feature | Permanent Tables | Transient Tables | Temporary Tables |
|---|---|---|---|
| Persistence | Until explicitly dropped | Until explicitly dropped | Ends with the session |
| Visibility | All authorized users | All authorized users | Creator's session only |
| Max Time Travel (Standard) | 1 day | 1 day | 1 day |
| Max Time Travel (Enterprise+) | 90 days | 1 day | 1 day |
| Fail-safe Period | 7 days | None | None |
| Typical Use Case | Critical production data | ETL/intermediate modeling (skills often covered in analytics engineering certifications) | Session-specific processing |
- Permanent tables are the default choice and provide the highest level of protection. They include full Time Travel and a 7-day Fail-safe period, making them ideal for critical production data.
- Transient tables persist across sessions but lack a Fail-safe period. These work well for ETL tasks or dimension tables that are regularly refreshed. Setting
DATA_RETENTION_TIME_IN_DAYS = 0on transient tables eliminates Time Travel and Fail-safe charges, which is helpful when data can be easily regenerated. - Temporary tables last only for the duration of a session and are visible only to the session creator. They are automatically deleted when the session ends or times out (typically after 4 hours of inactivity). To avoid unexpected storage charges, drop temporary tables as soon as they are no longer needed.
To monitor costs, use the TABLE_STORAGE_METRICS view. It provides a breakdown of storage usage, including ACTIVE_BYTES, TIME_TRAVEL_BYTES, and FAILSAFE_BYTES, so you can see exactly where your storage budget is going.
How to Design a Data Retention Policy
Creating a data retention policy starts with identifying what data you have, understanding how long it needs to be kept, and deciding what happens when that period ends. Developing these skills is a core part of mastering data engineering at an enterprise level. This approach helps you set retention periods that meet both business and regulatory needs.
Best Practices for Setting Retention Periods
When setting retention periods, consider both regulatory guidelines (like SEC, FINRA, and GDPR) and how often the data is used. Keeping data that isn’t accessed frequently can lead to unnecessary storage costs, so it’s best to retain only what’s actively needed.
Organize your data based on its sensitivity and how often it’s used. For example:
- High-churn staging data: Use the
DATA_RETENTION_TIME_IN_DAYSparameter set to0on transient tables to avoid Fail-safe charges. - Critical production data: Take advantage of the 90-day Time Travel window in Enterprise Edition for data recovery.
- Data with PII: A "retain, redact, then purge" approach can help preserve its analytical value while ensuring privacy.
Before purging any data, preview the records to avoid accidental deletions.
Balancing Storage Costs and Compliance
Once retention periods are set, consider the costs and compliance requirements that come with them. Longer retention typically means higher costs, but Snowflake’s COOL and COLD archive storage tiers can help reduce expenses for rarely accessed data.
| Feature | COOL Tier | COLD Tier |
|---|---|---|
| Retrieval Time | Instant | Up to 48 hours |
| Storage Cost | Higher | About 4x lower |
| Minimum Duration | 90 days | 180 days |
| Cloud Support | AWS, Azure, Google Cloud | AWS, Google Cloud |
- COOL storage: Offers instant access to data but at a higher cost.
- COLD storage: Costs significantly less but requires up to 48 hours to retrieve data. This is ideal for data kept solely for compliance purposes.
Be cautious of early deletion penalties. Deleting archived data before the minimum duration (90 days for COOL, 180 days for COLD) could result in charges for the unused time. Also, remember that data remains in standard storage during the Time Travel and 7-day Fail-safe windows, which can temporarily lead to double billing.
Managing the Data Lifecycle
Once your retention rules and cost plans are clear, automate the data lifecycle to ensure smooth compliance and governance. Storage Lifecycle Policies (SLPs) simplify this process by automating transitions - from active use to archiving and eventual deletion - based on user-defined SQL expressions. Snowflake generally applies these policies within 24 hours of setup, offering a buffer against accidental data loss.
To maintain effective governance, centralize key information like retention rules, PII flags, and legal hold statuses in a metadata table. For records involved in litigation or audits, exclude them from automated purges by including a subquery in your lifecycle policy to check for active legal holds. Use the INFORMATION_SCHEMA.STORAGE_LIFECYCLE_POLICY_HISTORY view to monitor the execution of these policies and ensure everything runs as expected.
How to Implement Retention Policies in Snowflake
Configuring Retention Settings
Snowflake lets you set the DATA_RETENTION_TIME_IN_DAYS parameter at various levels - account, database, schema, and table - allowing for flexibility. You can establish a default retention period at the account level and then fine-tune it for specific tables as needed.
| Command Level | SQL Example |
|---|---|
| Account | ALTER ACCOUNT SET DATA_RETENTION_TIME_IN_DAYS = 30; |
| Database | CREATE DATABASE my_db DATA_RETENTION_TIME_IN_DAYS = 15; |
| Schema | ALTER SCHEMA my_schema SET DATA_RETENTION_TIME_IN_DAYS = 7; |
| Table | CREATE TABLE my_table (id INT) DATA_RETENTION_TIME_IN_DAYS = 1; |
To prevent accidental or intentional overrides that could compromise critical data, use the MIN_DATA_RETENTION_TIME_IN_DAYS parameter. This ensures that the minimum retention period for any object is respected. The effective retention period is determined as the greater of DATA_RETENTION_TIME_IN_DAYS or MIN_DATA_RETENTION_TIME_IN_DAYS.
Keep in mind that changes to retention settings at the database or schema level only apply to active objects. Dropped objects retain the retention period that was active at the time of their deletion.
Once these settings are in place, you can use Snowflake's monitoring tools to verify their impact.
Monitoring Retention Policies
After configuring retention policies, it's crucial to monitor them to ensure compliance and manage costs effectively. Snowflake provides several tools to help you track retention settings and their impact:
| Monitoring Tool | Source | Purpose |
|---|---|---|
POLICY_REFERENCES |
INFORMATION_SCHEMA |
Shows which tables have storage lifecycle policies applied. |
STORAGE_LIFECYCLE_POLICY_HISTORY |
ACCOUNT_USAGE |
Provides a historical log of policy executions and related metadata. |
METERING_HISTORY |
ACCOUNT_USAGE |
Tracks credits consumed by policy-related processes. |
TABLE_STORAGE_METRICS |
ACCOUNT_USAGE |
Monitors storage usage in COOL/COLD tiers and flags early deletion penalties. |
You can also use commands like SHOW TABLES, SHOW SCHEMAS, or SHOW DATABASES and filter by the retention_time column to identify any objects that might not comply with your policies.
For row-level validation, consider automating checks with Snowflake tasks or stored procedures. These can compare record counts to ensure that data flagged for deletion is no longer accessible, even through Time Travel. When writing policy expressions, always use TO_DATE() to convert timestamps into dates. This ensures that policies execute consistently on a daily basis, regardless of the time they run.
Governance and Audit Readiness
Retention policies are not just about configuration - they're also a critical part of governance and compliance. To prepare for audits, log every lifecycle action. This includes execution IDs, target tables, purged record counts, and the associated Query ID. Such logs create a reliable audit trail for compliance reviews.
For organizations in regulated industries, Snowflake offers additional features like Retention Lock (available in the Business Critical Edition). This feature prevents backups from being deleted by any role, including ACCOUNTADMIN, for a specified period. Snowflake's backup infrastructure has been independently reviewed by Cohasset Associates for compliance with regulations like SEC 17a-4(f), SEC 18a-6(e), FINRA Rule 4511(c), and CFTC Rule 1.31(c)-(d).
If records are part of active litigation, applying a Legal Hold to the relevant backup set ensures that automated expiration is paused. Additionally, all access to these records is logged for audit purposes.
Conclusion: Maximizing Snowflake for Data Retention
Snowflake's approach to data retention is straightforward: retain what you need, archive when it makes sense, and delete when it's no longer necessary. This retain, archive, purge process is the foundation of a reliable retention strategy.
Snowflake's built-in tools streamline each step of this lifecycle. Features like Time Travel allow recovery of data for up to 90 days, while Storage Lifecycle Policies automate transitions between storage tiers, such as COOL and COLD. For long-term backups, Retention Locks ensure data remains secure. These tools eliminate the hassle of creating complex scripts or relying on external systems for retention management.
When planning your strategy, balancing cost and compliance is key. For example, the COLD tier is about four times cheaper than COOL storage. However, it requires up to 48 hours for data retrieval and enforces a minimum 180-day archival period, with penalties for early deletion.
To keep your retention program organized and defensible, centralize key details - such as retention periods, PII flags, and legal holds - in a metadata table. Use tools like INFORMATION_SCHEMA.STORAGE_LIFECYCLE_POLICY_HISTORY and audit logs to monitor and maintain compliance over time.
These practices highlight Snowflake's robust retention framework. To dive deeper into building production-ready Snowflake pipelines and governance systems, check out DataExpert.io Academy for practical training and resources.
FAQs
How do I choose the right retention time for each table?
Choosing how long to retain data hinges on factors like regulatory compliance, business needs, and storage costs. You'll want to set retention periods that align with these requirements, using metadata to manage rules, redact personally identifiable information (PII), and handle legal holds effectively.
For Time Travel, the default retention period is one day, though it can be extended up to 90 days if you're using the Enterprise Edition. To manage data over the long term, consider leveraging Storage Lifecycle Policies. These policies help automate processes like moving data to more affordable storage options or permanently deleting it after a defined period.
When should I use permanent vs transient vs temporary tables?
Opt for permanent tables when dealing with long-term, essential data that requires high durability and Fail-safe protection. For session-specific tasks, such as ETL work files, temporary tables are ideal since they automatically delete when the session ends and remain private to the user. If you need to store intermediate data that can be shared among team members and persist beyond a session but doesn’t require Fail-safe protection, transient tables are the way to go. Both temporary and transient tables can help lower Fail-safe storage costs.
How can I estimate and reduce Time Travel and Fail-safe storage costs?
To get a clear picture of your storage costs, you can use the TABLE_STORAGE_METRICS view or the ACCOUNT_USAGE.STORAGE_USAGE table. These tools help track storage across active data, Time Travel, and Fail-safe states.
Here are some ways to cut down on storage costs:
- Opt for temporary or transient tables for data that doesn’t need to stick around long. This avoids Fail-safe costs altogether.
- Reduce the DATA_RETENTION_TIME_IN_DAYS setting for permanent tables to limit how long historical data is kept.
- Regularly delete unused files from internal stages to free up space.
- Try to minimize updates as they can create new micro-partition versions, which take up more storage.
By staying proactive with these strategies, you can keep your storage costs in check.