
Access Control in Snowflake Migrations
Managing access control during Snowflake migrations is critical to ensuring security, compliance, and operational efficiency. Many teams choose to master data engineering through specialized academies to handle these complex migrations. Without proper planning, organizations risk carrying over security vulnerabilities, granting excessive permissions, or creating inefficiencies in user management.
Key Takeaways:
- Plan Access Controls Early: Evaluate existing users, roles, and permissions using commands like
SHOW GRANTSto identify gaps and cleanup opportunities. - Implement Role-Based Access Control (RBAC): Structure roles around business functions, link them to specific permissions, and avoid over-reliance on high-privilege roles like
ACCOUNTADMIN. - Strengthen Authentication: Enforce Multi-Factor Authentication (MFA) for admins, use SAML or OAuth for secure logins, and classify users as PERSON, SERVICE, or LEGACY_SERVICE for tailored security policies.
- Centralize Privilege Management: Use managed access schemas and future grants to automate permissions and ensure compliance.
- Set Network and Session Policies: Restrict access with network rules and enforce session timeouts to limit risks from idle connections.
- Post-Migration Monitoring: Continuously audit permissions, track user activity with
ACCESS_HISTORY, and refine RBAC to maintain least privilege.
Checklist for Snowflake Migration Access Control:
- Inventory users, roles, and permissions.
- Design a scalable RBAC hierarchy.
- Enforce MFA and secure authentication practices.
- Apply network and session policies.
- Monitor activity and refine access controls post-migration.
Access Control in Snowflake Database ~ Snowflake Tutorial
sbb-itb-61a6e59
Assessing Current Access Controls Before Migration
Before you dive into migration, it's crucial to evaluate your current access controls. This process helps pinpoint areas that need cleanup, opportunities for automation, and potential security gaps. Here's a detailed breakdown of the steps involved in conducting a thorough access control assessment.
Create an Inventory of Users, Roles, and Permissions
Start by cataloging every user, role, and permission in your existing system. Use commands like SHOW USERS, SHOW ROLES, and SHOW GRANTS to compile a complete inventory. The SHOW GRANTS command is especially versatile. For example:
SHOW GRANTS TO USER <name>: Lists all roles and direct privileges assigned to a specific user.SHOW GRANTS TO ROLE <name>: Displays everything a role has access to.SHOW GRANTS ON ACCOUNT: Provides a snapshot of all global privileges granted to roles.
For automated permissions, run SHOW FUTURE GRANTS to identify privileges applied to objects not yet created. If you’re working in a larger organization, the SNOWFLAKE.ACCOUNT_USAGE.GRANTS_TO_ROLES view can give you a historical record of grants, which you can query using standard SQL. Make sure to perform this inventory using roles like SECURITYADMIN or ACCOUNTADMIN, as they have the MANAGE GRANTS privilege required to see all permissions.
Pay special attention to the OWNERSHIP privilege, which is automatically assigned to the role that creates an object. This privilege is essential for altering or dropping objects, so documenting it ensures data stewardship after migration. Additionally, flag inactive accounts or roles with no privileges and plan for their removal.
Review Authentication Methods
Once you’ve inventoried users, roles, and permissions, shift your focus to authentication methods. This step is vital for identifying and addressing potential vulnerabilities. Tools like the Snowflake Trust Center and Threat Intelligence scanner package can help you detect users relying on single-factor authentication or accounts with compromised credentials found on the dark web.
To understand how users are authenticating, query the SNOWFLAKE.ACCOUNT_USAGE.LOGIN_HISTORY view. This will reveal which methods - SAML, OAuth, key-pair, or password - are actually being used. For example, if a user is configured with a password but consistently logs in using SAML, you should consider removing the unused password.
Classify users into three categories:
- PERSON: Human users.
- SERVICE: Programmatic access accounts.
- LEGACY_SERVICE: Temporary migration accounts requiring password-only access.
The Trust Center CIS scanner can also flag accounts inactive for over 90 days, making it easier to identify those that should be disabled. For administrative roles, ensure at least two users have the ACCOUNTADMIN role to prevent lockouts. Additionally, require all administrators to use Multi-Factor Authentication (MFA).
Design Role-Based Access Control (RBAC) Hierarchies
A solid RBAC hierarchy is key to avoiding "role explosion", where too many redundant roles make management chaotic. Proper RBAC implementation can significantly speed up processes like onboarding, cutting the time required from days to just hours. The goal is to align roles with business functions rather than individual users, creating a scalable and secure structure.
Consider a two-tier model:
- Access Roles: Define specific permissions for objects, such as read-only access to a database.
- Functional Roles: Align with business functions, like "Data Analyst" or "Data Engineer."
Link Access Roles to Functional Roles, then assign Functional Roles to users. This structure naturally scales as your organization grows. Ensure that all custom role hierarchies ultimately roll up to the system-defined SYSADMIN role. This way, system administrators can manage database objects without needing ACCOUNTADMIN privileges for day-to-day tasks.
During migration, use managed access schemas to centralize permission management. In these schemas, only the schema owner or a role with MANAGE GRANTS can assign privileges, preventing individual object owners from making independent decisions. This approach simplifies audits and ensures compliance with regulations like HIPAA, GDPR, and SOX. To further streamline operations, define privileges using future grants. These automate access for new tables or views as they’re created, saving time and reducing manual effort from the start.
Setting Up User Types and Authentication
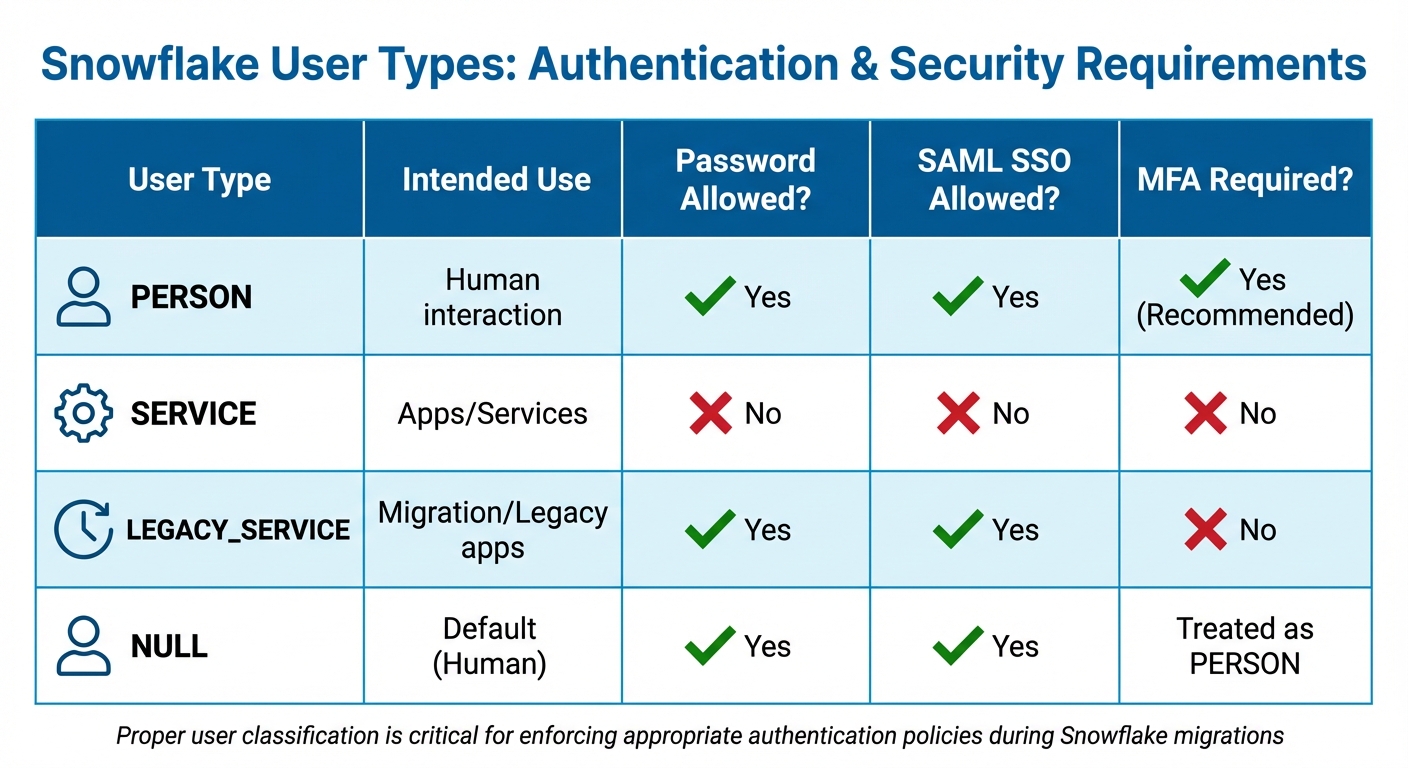
Snowflake User Types and Authentication Requirements Comparison
When configuring users in Snowflake, the TYPE property plays a key role in enforcing proper authentication policies. This property differentiates between human users and automated services, directly influencing how MFA (Multi-Factor Authentication) and other security measures are applied. Getting this setup right from the start helps close security gaps and makes policy enforcement smoother during your migration.
Classify Users by Type
Snowflake categorizes users into three main types: PERSON, SERVICE, and LEGACY_SERVICE. Each type serves a specific purpose and comes with distinct security requirements:
| User Type | Intended Use | Password Allowed? | SAML SSO Allowed? | MFA Required? |
|---|---|---|---|---|
| PERSON | Human interaction | Yes | Yes | Yes (Recommended) |
| SERVICE | Apps/Services | No | No | No |
| LEGACY_SERVICE | Migration/Legacy apps | Yes | Yes | No |
| NULL | Default (Human) | Yes | Yes | Treated as PERSON |
To classify users correctly, use commands like ALTER USER ... SET TYPE = SERVICE or PERSON. This ensures that the appropriate security policies are applied from day one. If your organization uses an identity provider, SCIM (System for Cross-domain Identity Management) can automate user provisioning and set the TYPE attribute based on identity provider data. This automation reduces manual errors and scales easily as your organization grows. Additionally, adopting naming conventions - like using a svc_ prefix for service accounts - can simplify user identification and cleanup tasks.
Once user types are set, you can implement tailored authentication policies to secure access.
Enforce Secure Authentication Policies
Snowflake supports federated authentication (e.g., SAML for human users and OAuth for services), which is generally more secure than passwords. Authentication policies are applied in a specific order, so understanding this precedence is key to layering your security effectively.
For PERSON users, enforce MFA enrollment through authentication policies. For instance:
REQUIRED_PASSWORD_ONLYmandates MFA for users logging in with passwords.REQUIREDenforces MFA even for users authenticating via SSO.
SERVICE users, on the other hand, are limited to key-pair or OAuth authentication. They are exempt from MFA and cannot use passwords. For legacy applications that don’t support OAuth or SAML, consider Programmatic Access Tokens (PATs). These tokens are time-limited (defaulting to 15 days but configurable up to 365 days) and can be scoped to specific roles and network policies.
Test authentication policies at the user level before applying them broadly at the account level. This phased approach allows for configuration validation without disrupting production workflows. Once a user has transitioned to SAML or OAuth, remove their local Snowflake password to minimize credential theft risks. Be sure to retain at least one administrator account with a non-restrictive authentication policy to avoid accidental lockouts.
Disable or Remove Unused Accounts
Inactive accounts pose unnecessary security risks, so it’s essential to disable or remove them after securing active ones. Snowflake’s Trust Center CIS scanner helps identify users who haven’t logged in for the past 90 days. Use the SNOWFLAKE.TRUST_CENTER.FINDINGS query and cross-check with LOGIN_HISTORY to ensure no critical service accounts are mistakenly flagged.
Start by disabling users with ALTER USER ... SET DISABLED = TRUE. This prevents logins while preserving any objects they own. This step gives you time to monitor for broken dependencies or legacy systems still relying on these accounts. If you drop a user without reassigning their worksheets (with "Edit" permissions) to another user, those worksheets become inaccessible. Snowflake administrators can only recover up to 500 worksheets from a dropped user.
For organizations using SCIM, automatic deprovisioning ensures that when someone leaves, their Snowflake account is disabled without manual intervention.
Configuring Network and Session Policies
It's essential to control where users connect from and how long their sessions remain active. Once you've set up user and role configurations, securing network boundaries and managing session durations adds another layer of protection. These policies help limit unauthorized access and mitigate risks from idle sessions.
Set Up Network Policies
Network policies determine who can access Snowflake by filtering requests based on their origin. Snowflake now uses network rules - schema-level objects that group network identifiers. These replace the older ALLOWED_IP_LIST and BLOCKED_IP_LIST parameters, which were cumbersome to manage at scale.
Supported network identifiers include IPv4 addresses (in CIDR format), AWS VPCE IDs, Azure LinkIDs, and GCP PSCIDs. If you need to enforce geographic restrictions, create separate network rules for each region. For example, you could set up one rule for North America and another for Europe and the Middle East. Additionally, Snowflake-managed network rules can automatically update IP ranges for popular partner tools like Microsoft Power BI, Tableau, and dbt.
Network policies can be applied at three levels, ranked by specificity: Security Integration (most specific), User, and Account (most general). To avoid disruptions, test new rules at the user level before applying them account-wide. Before enabling a network policy at the account level, ensure your current IP address or private endpoint identifier is included in the ALLOWED_NETWORK_RULE_LIST. Otherwise, you may be locked out, and Snowflake will return an error.
For Business Critical editions, you can configure around 250 IPv4 address ranges and 200 VPCE IDs per policy. In contrast, Standard and Enterprise editions allow only 10 IPv4 ranges and 7 VPCE IDs. If you're using AWS internal stages, the account administrator must enable the ENFORCE_NETWORK_RULES_FOR_INTERNAL_STAGES parameter to secure them.
With network policies in place, the next step is to fine-tune session policies to manage user activity and idle connections.
Configure Session Timeout Policies
Session policies control how long a session can remain idle before timing out. By default, this is set to 240 minutes (4 hours). You can adjust the timeout period between a minimum of 5 minutes and a maximum of 1,440 minutes (24 hours). The timer starts only after a period of inactivity, so as long as users remain active, their sessions continue uninterrupted.
Snowflake uses SESSION_IDLE_TIMEOUT_MINS for programmatic access and Snowflake clients (CLI, connectors) and SESSION_UI_IDLE_TIMEOUT_MINS for the Snowsight web interface. For the web interface, a shorter timeout - such as 20 minutes - is recommended to improve security for interactive sessions. For service accounts, longer timeouts are better to ensure automated workflows run without interruptions.
Set a baseline session policy at the account level to maintain a consistent security standard, and then use user-level policies for specific needs. User-level policies always take priority over account-level ones. Avoid enabling CLIENT_SESSION_KEEP_ALIVE=TRUE, as it can result in many open sessions, increased resource usage, and potential performance issues. Keep an eye on session activity to ensure policies remain effective as your migration progresses.
Managing Access Control After Migration
Once the migration is complete, it's crucial to keep refining, monitoring, and testing your access controls. Access control isn't something you set and forget - it requires ongoing adjustments and oversight to ensure users have the right permissions at all times.
Refine RBAC and Apply Least Privilege
After migration, take time to fine-tune your role-based access control (RBAC). Update access roles to reflect object-level permissions and functional roles that align with different business units. For example, access roles might grant read-only access to specific schemas, while functional roles like "Analyst" or "Data Engineer" relate to job responsibilities. This separation creates a clear structure that simplifies updates and can dramatically speed up employee onboarding - from days to just hours.
Building on earlier configurations, consider adopting managed access schemas. These schemas centralize security by ensuring that only the schema owner or roles with the MANAGE GRANTS privilege can authorize permissions. This setup prevents individual object owners from granting access on their own. You can also define future grants, such as "GRANT SELECT ON FUTURE TABLES", to automatically apply permissions to new objects without manual updates.
Make sure all custom roles eventually roll up to the SYSADMIN role, which allows administrators to manage objects effectively. Keep the ACCOUNTADMIN role strictly for account-level tasks and limit its use to a small, trusted group. Once these role adjustments are in place, shift your focus to monitoring and auditing access.
Set Up Monitoring and Auditing
With refined RBAC in place, continuous monitoring becomes essential. Use the ACCOUNT_USAGE.ACCESS_HISTORY view to track query executions - this will show who accessed which data and when. The GRANTS_TO_ROLES view helps you monitor privilege changes and identify dormant access that may need to be revoked.
As Emily Winks, a data governance expert at Atlan, highlights:
"Snowflake reports nearly 150% growth in usage of governed data, showing that governance actually increases consumption rather than blocking it."
Leverage the Snowflake Trust Center to monitor authentication patterns, failed login attempts, and other security anomalies in real time. Tools like the Threat Intelligence Scanner Package can help identify risky users and unusual authentication behavior. Enable leaked password protection to automatically disable any compromised credentials found on the dark web.
It's worth noting that in 2024, a Snowflake breach affected up to 165 organizations, largely due to stolen credentials and the absence of multi-factor authentication (MFA). To mitigate similar risks, set up automated alerts for failed logins or unusual warehouse activity. Regularly rotate service account credentials and API tokens to minimize the chances of long-term credential theft.
Test Access Control Changes Safely
Once your monitoring systems are active, validate your updated access controls by testing changes in a controlled environment. Use zero-copy cloning to create a sandbox environment where you can safely test RBAC adjustments without impacting production or incurring extra storage costs.
Simulate shared data scenarios by enabling the SIMULATED_DATA_SHARING_CONSUMER session parameter and activating secondary roles (USE SECONDARY ROLES ALL). This allows you to assess how combined privileges might affect access.
Regular audits are essential. Query the SNOWFLAKE.ACCOUNT_USAGE.GRANTS_TO_ROLES view to review current privileges. Use the OBJECT_DEPENDENCIES view to analyze the potential impact of changes, ensuring that downstream dashboards or data pipelines aren't disrupted. These steps help maintain a secure and efficient access control system over time.
Conclusion and Key Takeaways
When it comes to access control in Snowflake migrations, careful planning is non-negotiable. Start by laying a solid RBAC (Role-Based Access Control) foundation, accurately classifying users, and implementing strong authentication measures. After the migration, focus on fine-tuning privileges, monitoring activity, and testing any changes to maintain a secure environment.
One of the most important steps is separating responsibilities across system roles. For example, reserve the ACCOUNTADMIN role for account-level tasks like billing and parameter management. Meanwhile, assign SYSADMIN and custom functional roles for day-to-day operations. This approach reduces the risk of privilege creep and simplifies audits.
Centralized management through managed access schemas is another key strategy. This prevents object owners from independently granting permissions. Pair this with future grants to ensure new tables and views automatically inherit the correct permissions. Additionally, network policies should restrict service accounts to specific IP addresses, and session timeouts should force re-authentication after inactivity - 20 minutes for web interfaces and 240 minutes for programmatic clients.
Ongoing monitoring is critical. Use the Trust Center CIS scanner to identify inactive users and conduct weekly threat intelligence scans. Regularly query SNOWFLAKE.ACCOUNT_USAGE.GRANTS_TO_ROLES to audit privileges and spot any deviations from your intended access model. Keep in mind that updates to service principals in Open Catalog may take up to an hour to propagate.
Access Control Checklist for Snowflake Migrations
Use this checklist to ensure your migration strategy covers all the essentials:
| Migration Phase | Key Activities |
|---|---|
| Phase 1: Detect | Identify risky users (e.g., single-factor authentication), leaked passwords, and inactive accounts with the Trust Center. |
| Phase 2: Plan | Map users to types (PERSON/SERVICE), define authentication methods (SAML/OAuth), and design role hierarchies. |
| Phase 3: Protect | Assign user types, remove unnecessary local passwords, and enforce network and authentication policies. |
| Phase 4: Monitor | Continuously audit security posture using Trust Center scanners and LOGIN_HISTORY. |
Before migration, take inventory of all users, roles, and permissions. Create an RBAC hierarchy where access roles roll up to functional roles, and classify users into categories like PERSON, SERVICE, or LEGACY_SERVICE.
During migration, make multi-factor authentication (MFA) mandatory for highly privileged roles, including ACCOUNTADMIN, SECURITYADMIN, and SYSADMIN. Implement network policies and disable accounts that are no longer in use.
After migration, apply least privilege principles. Use views like ACCOUNT_USAGE.ACCESS_HISTORY and GRANTS_TO_ROLES to monitor activity. Test any changes in sandbox environments before rolling them out. Regularly rotate service account credentials and API tokens, and transition legacy applications to time-bound PATs (Personal Access Tokens).
Additional Training Resources
To keep up with evolving access control practices, ongoing education is essential. For hands-on learning, check out DataExpert.io Academy (https://dataexpert.io). Their specialized boot camps focus on data engineering and analytics engineering, offering practical training with tools like Snowflake, AWS, and Databricks. These programs include capstone projects that let you apply access control concepts in realistic scenarios. Plus, guest speaker sessions and a supportive learning community provide valuable insights to help you tackle migration challenges.
FAQs
What’s the safest way to migrate roles and grants into Snowflake?
To migrate roles and grants into Snowflake without issues, use the GRANT statement to assign privileges to roles effectively. Focus on managing access through role-based permissions and maintaining a well-structured role hierarchy. When making changes, avoid revoking existing grants directly. Instead, detach grants from their current state to prevent disruptions. Throughout the process, ensure privilege inheritance remains intact to maintain smooth access control.
How should I choose between PERSON, SERVICE, and LEGACY_SERVICE users?
When working with Snowflake, it's essential to assign the right user type based on how access will be used:
- PERSON users are designed for individuals who directly interact with Snowflake. These accounts require multi-factor authentication (MFA), making them ideal for human access.
- SERVICE users are intended for automated processes. These accounts bypass MFA, making them perfect for secure, non-interactive tasks like running scripts or integrations.
- LEGACY_SERVICE users are outdated and should be avoided. Instead, opt for SERVICE users to maintain better security standards.
By aligning user types with their specific purpose, you can ensure efficient and secure access control, particularly during migrations.
How can I avoid lockouts when enabling MFA and network policies?
When setting up MFA and network policies in Snowflake, it's important to take steps to prevent lockouts. Here's how you can ensure a smooth transition:
- Set up network policies for trusted sources: Configure service user-level network policies to allow access from reliable, pre-approved locations.
- Enable MFA for all accounts: Make sure both user and service accounts have MFA enabled before enforcing any policies.
- Assign multiple MFA-enabled admins: Designate several administrators with the necessary roles and ensure they have MFA enabled to avoid being locked out.
Additionally, test these changes in a controlled environment first. Gradually roll out policies and keep an eye on user activity to catch any issues early. This approach helps maintain access and avoids unnecessary disruptions.